Brains drop from above and you catch them in the crate. You get a point for every brain collected. Please note the excessive use of particle effects in this scene. Using free Asset store models.
So far, basic games. The core mechanic in each has the potential to be commercial successful, but only with significant investment in the art department. You have to catch and hold the eyes and ears of the demographic likely to spend any kind of money for such a simple game. The other key to success with this kind of game is the level of social interaction it provides - updates to Facebook, Twitter, etc. This is an area I have zero experience in.
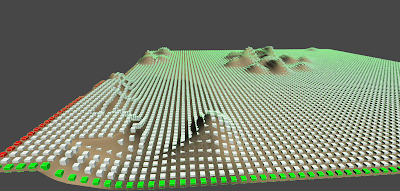
The next step is to consider some more sophisticated game mechanics. Things like random level layouts add re-playability to a game. I tried that out next, the result is this maze generator. It's not really a 'maze' thats being generated, but I couldnt think of a better word to describe it. If you want to follow along, I think it's a good start for your own levels or just learning how to do stuff if you are just starting to peek under the hood of Unity.
Create a new scene.
Create an empty GameObject and position it at 0,0,0. Rename it to Maze Generator
Attach the following script to it:
using UnityEngine;
using System.Collections;
using System.Collections.Generic;
public class Maze : MonoBehaviour {
public Transform playerPrefab;
internal Vector3 mazeOrigin = Vector3.zero;
public static int MazeWidth = 10; //cubes across
public static int MazeHeight = 10;//cubes down
public static int ChanceofWall = 25;
public int PlayerStartX = 1;
public int PlayerStartY = 1;
public static Texture WallMaterial;
public static Texture FloorMaterial;
public int[,] MazeLayout;
internal List<GameObject> cubes;
void Awake()
{
MazeLayout = new int[MazeWidth, MazeHeight];
cubes = new List<GameObject>();
}
void Start ()
{
this.transform.position = mazeOrigin;
MakeFloor();
MakeBoundaries();
MakeLayout();
PlacePlayer();
}
void MakeFloor()
{
for(int x = 0; x < MazeLayout.GetLength(0); x++)
{
for(int y = 0; y < MazeLayout.GetLength(1); y++)
{
GameObject cube = GameObject.CreatePrimitive(PrimitiveType.Cube);
Vector3 pos = new Vector3(mazeOrigin.x + x, -1f, mazeOrigin.y + y);
cube.transform.position = pos;
cube.tag = "Floor";
cube.renderer.material.mainTexture = FloorMaterial;
cube.transform.parent = this.transform;
cubes.Add(cube);
}
}
}
void MakeBoundaries()
{
for(int x = 0; x < MazeLayout.GetLength(0); x++)
{
for(int y = 0; y < MazeLayout.GetLength(1); y++)
{
if(x==0 || y == 0 || x == MazeWidth - 1 || y == MazeHeight - 1)
{
GameObject cube = GameObject.CreatePrimitive(PrimitiveType.Cube);
Vector3 pos = new Vector3(mazeOrigin.x + x, 0, mazeOrigin.y + y);
cube.transform.position = pos;
cube.tag = "Wall";
cube.renderer.material.mainTexture = WallMaterial;
cube.transform.parent = this.transform;
cubes.Add(cube);
}
}
}
}
void MakeLayout()
{
for(int x = 0; x < MazeLayout.GetLength(0); x++)
{
for(int y = 0; y < MazeLayout.GetLength(1); y++)
{
if(x > 1 && y > 1 && x < MazeWidth -2 && y < MazeHeight -2)
{
int wall = Random.Range(0, 100);
if(wall<ChanceofWall)
{
GameObject cube = GameObject.CreatePrimitive(PrimitiveType.Cube);
Vector3 pos = new Vector3(mazeOrigin.x + x, 0, mazeOrigin.y + y);
cube.transform.position = pos;
cube.tag = "Wall";
cube.renderer.material.mainTexture = WallMaterial;
cube.transform.parent = this.transform;
cubes.Add(cube);
}
}
}
}
}
void PlacePlayer()
{
Instantiate(playerPrefab, new Vector3(PlayerStartX, 0.1f, PlayerStartY), Quaternion.identity);
}
}
I made a player prefab out of a cylinder. I also moved the camera directly above the cylinder, pointing directly downwards and made it a child of the player object. This will cause it to always follow the player. Assign the player prefab to the Maze script in the inspector. Add a character controller component. Attach the following script to the Player object (contains controls for keyboard and xbox gamepad movement)
using UnityEngine;
using System.Collections;
[RequireComponent(typeof(AudioSource))]
public class Controller : MonoBehaviour {
public float MovementSpeed = 6.0f;
public float RotationSpeed = 100f;
public float JumpSpeed = 16.0f;
public float Gravity = 20.0f;
private Vector3 moveDirection = Vector3.zero;
void FixedUpdate ()
{
checkMovement();
}
void checkMovement()
{
CharacterController controller = GetComponent<CharacterController>();
if (controller.isGrounded)
{
moveDirection = new Vector3(Input.GetAxis("Horizontal"), 0, Input.GetAxis("Vertical"));
moveDirection = transform.TransformDirection(moveDirection);
moveDirection *= MovementSpeed;
if (Input.GetButton("Jump"))
{
moveDirection.y = JumpSpeed;
}
}
moveDirection.y -= Gravity * Time.deltaTime;
controller.Move(moveDirection * Time.deltaTime);
}
}
At this point, if you run it, you will see a 10x10 maze with white textures. I made WallMaterial and FloorMaterial static members because I needed to access them from a setup menu I made. If you do not intend to also create the setup scene then you will need to assign textures to those members yourself. If you remove the static prefix they will show up in the inspector. The setup screen will allow you to adjust the height and width of the generated maze, adjust the chance that a wall will appear, and select the textures to use on the walls and floor.
Creating the setup screen.
Create a folder in the root of your project called Resources. Drag each texture into this folder.
Create a new scene
Create an empty game object, call it GUIObject.
Attach the following script to it:
using UnityEngine;
using System.Collections;
using System.Collections.Generic;
public class GUIScript : MonoBehaviour {
public Texture2D icon;
private List<Texture> walltextures;
private List<Texture> floortextures;
private List<string> wallnames;
private List<string> floornames;
void Start () {
walltextures = new List<Texture>();
floortextures = new List<Texture>();
wallnames = new List<string>();
floornames = new List<string>();
wallnames.Add("Crate01");
wallnames.Add("Crate01b");
wallnames.Add("Crate02");
wallnames.Add("Crate02b");
wallnames.Add("Crate03");
wallnames.Add("Crate04");
wallnames.Add("Wall01");
wallnames.Add("Wall02");
wallnames.Add("Rock01");
wallnames.Add("ScifiPanel03");
floornames.Add("Floor01");
floornames.Add("Floor02");
floornames.Add("Floor03");
floornames.Add("Floor04");
floornames.Add("MetalBasic01");
floornames.Add("Rock02");
floornames.Add("Rock03");
floornames.Add("Rock04");
floornames.Add("ScifiPanel01");
floornames.Add("ScifiPanel02");
loadTextures();
}
void OnGUI()
{
//Make Background Box
GUI.Box (new Rect(10,10,670,300), "Maze Setup");
#region Height and Width
GUI.Label(new Rect(15,35,80, 20), "Maze Width");
if(GUI.Button(new Rect(105, 35, 20, 20), "-"))
{
MazeSettings.MazeWidth--;
}
if(GUI.Button(new Rect(125, 35, 20, 20), "+"))
{
MazeSettings.MazeWidth++;
}
GUI.Label(new Rect(150, 35, 30,20), MazeSettings.MazeWidth.ToString());
GUI.Label(new Rect(15,55,80, 20), "Maze Height");
if(GUI.Button(new Rect(105, 55, 20, 20), "-"))
{
MazeSettings.MazeHeight--;
}
if(GUI.Button(new Rect(125, 55, 20, 20), "+"))
{
MazeSettings.MazeHeight++;
}
GUI.Label(new Rect(150, 55, 30, 20), MazeSettings.MazeHeight.ToString());
#endregion
#region Randoms
GUI.Label(new Rect(15, 75, 110, 20), "Chance of Wall");
if(GUI.Button(new Rect(105, 75, 20, 20), "-"))
{
MazeSettings.ChanceofWall--;
}
if(GUI.Button(new Rect(125, 75, 20, 20), "+"))
{
MazeSettings.ChanceofWall++;
}
GUI.Label(new Rect(150, 75, 100, 20), MazeSettings.ChanceofWall.ToString() + "%");
#endregion
#region Textures
GUI.Label(new Rect(15, 95, 100, 20), "Wall Texture");
if(GUI.Button(new Rect(15, 115, 64, 64), walltextures[0]))
{
MazeSettings.WallMaterial = walltextures[0];
}
if(GUI.Button(new Rect(15 + 64, 115, 64, 64), walltextures[1]))
{
MazeSettings.WallMaterial = walltextures[1];
}
if(GUI.Button(new Rect(15 + 64 * 2, 115, 64, 64), walltextures[2]))
{
MazeSettings.WallMaterial = walltextures[2];
}
if(GUI.Button(new Rect(15 + 64 * 3, 115, 64, 64), walltextures[3]))
{
MazeSettings.WallMaterial = walltextures[3];
}
if(GUI.Button(new Rect(15 + 64 * 4, 115, 64, 64), walltextures[4]))
{
MazeSettings.WallMaterial = walltextures[4];
}
if(GUI.Button(new Rect(15 + 64 * 5, 115, 64, 64), walltextures[5]))
{
MazeSettings.WallMaterial = walltextures[5];
}
if(GUI.Button(new Rect(15 + 64 * 6, 115, 64, 64), walltextures[6]))
{
MazeSettings.WallMaterial = walltextures[6];
}
if(GUI.Button(new Rect(15 + 64 * 7, 115, 64, 64), walltextures[7]))
{
MazeSettings.WallMaterial = walltextures[7];
}
if(GUI.Button(new Rect(15 + 64 * 8, 115, 64, 64), walltextures[8]))
{
MazeSettings.WallMaterial = walltextures[8];
}
if(GUI.Button(new Rect(15 + 64 * 9, 115, 64, 64), walltextures[9]))
{
MazeSettings.WallMaterial = walltextures[9];
}
GUI.Label(new Rect(15, 95 + 84, 100, 20), "Floor Texture");
if(GUI.Button(new Rect(15, 199, 64, 64), floortextures[0]))
{
MazeSettings.FloorMaterial = floortextures[0];
}
if(GUI.Button(new Rect(15 + 64, 199, 64, 64), floortextures[1]))
{
MazeSettings.FloorMaterial = floortextures[1];
}
if(GUI.Button(new Rect(15 + 64 * 2, 199, 64, 64), floortextures[2]))
{
MazeSettings.FloorMaterial = floortextures[2];
}
if(GUI.Button(new Rect(15 + 64 * 3, 199, 64, 64), floortextures[3]))
{
MazeSettings.FloorMaterial = floortextures[3];
}
if(GUI.Button(new Rect(15 + 64 * 4, 199, 64, 64), floortextures[4]))
{
MazeSettings.FloorMaterial = floortextures[4];
}
if(GUI.Button(new Rect(15 + 64 * 5, 199, 64, 64), floortextures[5]))
{
MazeSettings.FloorMaterial = floortextures[5];
}
if(GUI.Button(new Rect(15 + 64 * 6, 199, 64, 64), floortextures[6]))
{
MazeSettings.FloorMaterial = floortextures[6];
}
if(GUI.Button(new Rect(15 + 64 * 7, 199, 64, 64), floortextures[7]))
{
MazeSettings.FloorMaterial = floortextures[7];
}
if(GUI.Button(new Rect(15 + 64 * 8, 199, 64, 64), floortextures[8]))
{
MazeSettings.FloorMaterial = floortextures[8];
}
if(GUI.Button(new Rect(15 + 64 * 9, 199, 64, 64), floortextures[9]))
{
MazeSettings.FloorMaterial = floortextures[9];
}
#endregion
if(GUI.Button(new Rect(15, 275, 110, 20), "Generate Maze"))
{
Application.LoadLevel("maze");
}
}
void loadTextures()
{
foreach(string name in floornames)
{
floortextures.Add(Resources.Load(name) as Texture);
}
foreach(string name in wallnames)
{
walltextures.Add(Resources.Load(name) as Texture);
}
}
}
The string being entered into wallnames and floornames must match the names in the resources folder. The resources folder is required to load assets on the fly. You will need to adjust the line near the end 'Application.LoadLevel("maze");'. Replace maze with the name of the scene you just saved. Set this setup scene as the default scene.
Setup Screen
Game View. Notice the camera is position above the player and looking straight down.
30x30 maze seen from scene view
150x150 maze seen from scene view
| 


