Sunday, June 23, 2013

How to import Sketchup Free models into Unity Free

Sometimes you need to get your 'Programmer Art' into Unity.  I recently tried out Sketchup for 3D modelling and found it an excellent tool to let me create some basic models for prototyping.  This method will allow you to import your own models, or models imported from Google 3D Warehouse.  If you dont use the paid version of Sketchuo,  you will need this free plugin.  If you don't want to register on that site, its in my Dropbox.  Put this file in your sketchup\plugins folder.


Lets get started:

First we need a Sketchup model.  Here is one I made earlier :).  Feel free to use it or make your own.  If you choose to make your own, I recommend using the Simple Metre template, as the scale will match Unity.  If you want pull something from the warehouse, go to Window > Components and use the search bar.
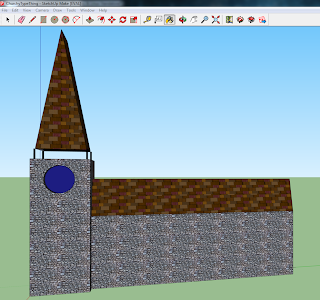
A churchy type thing


When you are ready to export your model:

Select File > OBJ Exporter
Give it a filename and select YES to convert all texture files to PNG.
This process will also optimise the model (remove duplicate vertices etc..)

To import the model into Unity:

Copy the .mtl,.obj and the model textures folder into your projects Asset folder.  Create a new folder or use an existing one, it doesn't matter as long as it is in the Assets folder.
Open your Unity project.  You will see the model and its associated files in the project window.
There will be a prefab ready for you to drag into your scene (or instantiate through code), with it's textures intact, including the UV mappings.

The same churchy thing in a Unity scene.


Saturday, June 22, 2013

Useful Xamarin.IOS code for Filter Information.

I know with IOS7 coming, making Filter code could be a thing of the past..

But I wanted to throw this code out there anyways.


CIFilter filter = CIFilter.FromName ("CISharpenLuminance");
string[] keys = filter.InputKeys;
NSDictionary attributes = filter.Attributes;
foreach(NSObject key in attributes.Keys)
{
    Console.WriteLine(key.ToString());
    Console.WriteLine (attributes[key].ToString());
}
foreach (string s in keys)System.Console.WriteLine (s);


Pick your filter.. throw it into the CIFilter.FromName() line, and bam, you have all the info you need to apply it.

How to use Xamarin's new UI Designer with Paint Code for custom controls.


After reading this post by the Xamarin team, I really wanted to get to work on making some nifty things.   So, I basically pulled down the latest updates in the Alpha channel from Xamarin, made a new project, and hopped right in.

I wanted to see how much easier it was to make custom styled components and add them to my applications, and boy, was I impressed how much faster it is.


Using the UIButton for this little example of code, is probably the worst thing I could have done, but oh well.  I created this simple class, MyButton and inherited from UIButton. 


    [Register("MyButton")]
    public class MyButton : UIButton
    {
        public MyButton ()
        {

        }
        public MyButton (IntPtr handle)
        {
            this.Handle = handle;
        }
        public override void Draw (System.Drawing.RectangleF rect)
        {
            base.Draw (rect);
        
            var context = UIGraphics.GetCurrentContext();

            //// Color Declarations
            UIColor strokeColor = UIColor.FromRGBA(0.000f, 0.000f, 0.000f, 1.000f);

            //// Shadow Declarations
            var shadow = strokeColor.CGColor;
            var shadowOffset = new SizeF(3.1f, 3.1f);
            var shadowBlurRadius = 5;

            //// Image Declarations
            var image = UIImage.FromFile("Test2.png");

            //// Rectangle Drawing
            var rectanglePath = UIBezierPath.FromRoundedRect(rect, 8);
            context.SaveState();
            context.SetShadowWithColor(shadowOffset, shadowBlurRadius, shadow);
            context.SaveState();
            rectanglePath.AddClip();
            image.Draw(rect);
            context.RestoreState();
            context.RestoreState();

            strokeColor.SetStroke();
            rectanglePath.LineWidth = 1;
            rectanglePath.Stroke();
        }
    }


The Draw code, came from PaintCode.. I had to tweak a couple things, one, I had to tweak image.Draw to match the button's submitted rect for Draw.  Below is a screenshot from PaintCode, I set the Corners to rounded, upped the radius so that it was visible for the rounding of the corners, then I picked a texture image, for the fill.


Below is rendered output inside of their new designer.. which means I didn't need to deploy in order to see a result.  


Friday, June 21, 2013

Print Hub status update.

Graph provided by AppFigures.com
As you can see, I'm still getting purchases.. even without marketing, and without being listed as a supporting app on Google Cloud Print.

I'm hoping this weekend to finish off those requirements, so I can get listed, and then I'll see if my purchase rate goes up.

I had a chat with App.IO's CEO this week, I have a weird suspicion that the App.IO team bought my app and that's why I had that surge of purchases.  Just told him I loved the platform.. and that he needed some "C guys" to deal with the latency in rendering for the product.   To be honest, they really don't need the work done.. who cares if it is laggy.  It's gorgeous.

Here this weekend, I'm going to try and get the start of my next couple apps going.

I don't know what to think.  I don't think being an independent mobile developer will ever be easy, but I do know that I'm going to keep adding my features.  I'm pretty much operating at a loss, in regards to App Store deployments, but honestly, I'm ok with it.  I've gotten some components, that I'll be able to re-use for other projects.  I probably still need a lot more components to be able to do the wide array of applications I intend to do.


Sunday, June 16, 2013

Example of Deleting from SQLite DB using C# in Xamarin Android

I tried to use LINQ syntax to delete my objects from a table like shown here, but got an error "Cannot store type:  MyObject":

private static void DeleteOldObjects()
{
 string path = Path.Combine (System.Environment.GetFolderPath (System.Environment.SpecialFolder.MyDocuments), "MyDatabase.db");
 var db = new SQLiteConnection(path,password,false);
 var query = db.Table<MyObject>().Where(rt => rt.Date < DateTime.Now.AddDays(-3));

 if (query != null) {
  foreach (var object in query.ToList<MyObject>()) {
   db.Delete<MyObject>(object);
  }
 }
 db.Commit ();
}

From what I could determine by looking at the SQLite.cs code, it seems like this error is when it's trying to bind my object as a parameter:


internal static void BindParameter (IntPtr stmt, int index, object value)
{
  if (value == null) {
    SQLite3.BindNull (stmt, index);
  } else {
    if (value is Int32) {
      SQLite3.BindInt (stmt, index, (int)value);
    } else if (value is String) {
      SQLite3.BindText (stmt, index, (string)value, -1, NegativePointer);
    } else if (value is Byte || value is UInt16 || value is SByte || value is Int16) {
      SQLite3.BindInt (stmt, index, Convert.ToInt32 (value));
    } else if (value is Boolean) {
      SQLite3.BindInt (stmt, index, (bool)value ? 1 : 0);
    } else if (value is UInt32 || value is Int64) {
      SQLite3.BindInt64 (stmt, index, Convert.ToInt64 (value));
    } else if (value is Single || value is Double || value is Decimal) {
      SQLite3.BindDouble (stmt, index, Convert.ToDouble (value));
    } else if (value is DateTime) {
      SQLite3.BindText (stmt, index, ((DateTime)value).ToString ("yyyy-MM-dd HH:mm:ss"), -1, NegativePointer);
    } else if (value.GetType ().IsEnum) {
      SQLite3.BindInt (stmt, index, Convert.ToInt32 (value));
    } else if (value is byte[]) {
      SQLite3.BindBlob (stmt, index, (byte[])value, ((byte[])value).Length, NegativePointer);
    } else {
      throw new NotSupportedException ("Cannot store type: " + value.GetType ());
    }
  }
}

That seemed to me like the most intuitive way to perform that task since it's the same syntax used to insert objects, but since it didn't work I found you actually need to pass the primary key of the object you want to delete, like this:

private static void DeleteOldObjects()
{
 string path = Path.Combine (System.Environment.GetFolderPath (System.Environment.SpecialFolder.MyDocuments), "MyDatabase.db");
 var db = new SQLiteConnection(path,password,false);
 DateTime expireDate = DateTime.Now.AddDays(-3));
 var query = db.Table<MyObject>().Where(rt => rt.Date < expireDate );

 if (query != null) {
  foreach (var object in query.ToList<MyObject>()) {
   db.Delete<MyObject>(object.PrimaryKeyId);
  }
 }
 db.Commit ();
}

Saturday, June 15, 2013

Efficient Custom ListView Adapter Selections

A customer requested I create a ListView of their business objects using custom graphics and text based on the status of the object.  I had no problem creating it but they complained that it took too long to refresh when making selections.  After puzzling over the code for awhile trying to determine how to speed it up, I realized that the convertView paramter passed in to the GetView method that I was overriding in my custom listview adapter was actually the existing view of the object, and if it wasn't null I didn't have to recreate it.

So now in my code I check first and I only create the view from scratch if it's null.  Otherwise, I only modify the existing view to change the background color to signify that it has been selected.  I also store the two Drawables that are the backgrounds so they don't have to be retrieved and assigned memory for each object.  This allows the ListView to refresh quickly as it doesn't have to reacquire the underlying objects and rebuild the entire view based on the object's properties each time the selection is changed.  This seems like a simple thing, but maybe someone else that is struggling with ListView performance will happen across my post.

namespace Droid
{
 public class ListViewObjectAdapter : BaseAdapter<MyObject> {
  List<MyObject> items;
  public int selectedListItem = -1;
  Activity context;
  Drawable bgDefault;
  Drawable bgHighlight;

  public ListViewobjectAdapter(Activity context, List<MyObject> items)
   : base()
  {
   this.context = context;
   this.items = items;
   Drawable bgDefault = context.Resources.GetDrawable(Resource.Drawable.gray_button_focused);
   Drawable bgHighlight = context.Resources.GetDrawable(Resource.Drawable.gray_button_default);
  }

  public override long GetItemId(int position)
  {
   return position;
  }

  public void SetItems(List<MyObject> items)
  {
   this.items = items;
   this.NotifyDataSetInvalidated ();
  }

  public override MyObject this[int position]
  {
   get { return items[position]; }
  }

  public override int Count
  {
   get { return items.Count; }
  }

  public override View GetView(int position, View convertView, ViewGroup parent)
  {
   View view = convertView;

   if (view == null)
   {
    string SENT_PREFIX = context.Resources.GetString(Resource.String.sent_object_prefix);
    string UNSENT_PREFIX = context.Resources.GetString(Resource.String.unsent_object_prefix);

    MyObject item = items[position];
    Subobject subobject = Helper.GetSubobjectById (item.SubobjectId);

    view = context.LayoutInflater.Inflate (Resource.Layout.ListViewObjectItem, null);
    view.FindViewById<TextView> (Resource.Id.tvTitle).Text = Helper.GetInfoBySubOject (SubObject);

    if (item.Date.Date.Equals (DateTime.Now.Date))
     view.FindViewById<TextView> (Resource.Id.tvobjectId).Text = item.Date.ToShortTimeString ();
    else
     view.FindViewById<TextView> (Resource.Id.tvobjectId).Text = item.Date.ToShortDateString ();

    view.FindViewById<TextView> (Resource.Id.tvobjectIdText).Text = "";

    if (item.IsValid) {
     view.FindViewById<ImageView> (Resource.Id.Image2).SetImageResource (Resource.Drawable.icon_accept);
     view.FindViewById<TextView> (Resource.Id.tvDescription).Text = "Extra Info: " + Helper.GetAdditionalInfoByObjectId(item.MyObjectId);
    } else {
     view.FindViewById<ImageView> (Resource.Id.Image2).SetImageResource (Resource.Drawable.icon_reject);
     ValidSubobject SubobjectMeasure = Helper.GetValidSubObjectByObjectId (item.MyObjectId);
     view.FindViewById<TextView> (Resource.Id.tvDescription).Text = "MyInfo: " + SubobjectMeasure.Info.ToString () + ";
    }
   }
   RelativeLayout rlListViewItem = (RelativeLayout)view.FindViewById (Resource.Id.rlListViewItem);
   if(position == selectedListItem) {  
    rlListViewItem.SetBackgroundDrawable(bgHighlight);
   } else {
    rlListViewItem.SetBackgroundDrawable(bgDefault );
   }

   return view;
  }
 }
}

Sunday, June 9, 2013

Sepia Tone UIViewController Xamarin.IOS.


I made the slider in XCode resolve as "TheSlider"
I made the UIImageView resolve as "TheImage"
I made the Buttons resolve as their text values.

Below is the Code:

public partial class SepiaToneController : UIViewController
    {
        static bool UserInterfaceIdiomIsPhone {
     get { return UIDevice.CurrentDevice.UserInterfaceIdiom == UIUserInterfaceIdiom.Phone; }
        }
        string path;
        MonoTouch.CoreImage.CISepiaTone filter = new MonoTouch.CoreImage.CISepiaTone();
        public SepiaToneController (string Path)
            : base (UserInterfaceIdiomIsPhone ? "SepiaToneController_iPhone" : "SepiaToneController_iPad", null)
        {
            path = Path;

        }

        public override void DidReceiveMemoryWarning ()
        {
            // Releases the view if it doesn't have a superview.
            base.DidReceiveMemoryWarning ();
            
            // Release any cached data, images, etc that aren't in use.
        }

        public override void ViewDidLoad ()
        {
            base.ViewDidLoad ();
            this.Title = "Sepia Tone";
            TheSlider.MinValue = 0;
            TheSlider.MaxValue = 1;
            TheSlider.Value = 0;
        
            Preview.TouchUpInside += delegate {
                UpdateImage();
            };
            Save.TouchUpInside += delegate {
                SaveImage();
            };

    
        }
        public void UpdateImage()
        {
            BTProgressHUD.Show ("Applying Filter. . .", -1, BTProgressHUD.MaskType.Black);
            BTProgressHUD.InvokeInBackground (delegate { 
                
            this.TheImage.ContentMode = UIViewContentMode.ScaleAspectFit;

            if (TheSlider.Value == 0) {
                var image = UIImage.FromFile (path);
                filter.Intensity = TheSlider.Value;
                filter.Image = new CIImage (UIImage.FromFile(path));
                UIImage blah = new UIImage (new CIImage(UIImage.FromFile(path)),1,image.Orientation);
                this.TheImage.Image = blah;


            } else {

                var image = UIImage.FromFile (path);
                filter.Intensity = TheSlider.Value;
                filter.Image = new CIImage (UIImage.FromFile(path));
                var newimage = filter.OutputImage;
                UIImage returnImage = new UIImage(newimage);
                UIImage blah = new UIImage (filter.OutputImage,1,image.Orientation);

                //.ImageByCroppingToRect(new RectangleF(0, 0, this.View.Bounds.Width, this.View.Bounds.Height * 9 / 16)

                this.TheImage.Image = blah;
            
            }
                BTProgressHUD.Dismiss();
            });
        }
        public void SaveImage()
        {
            BTProgressHUD.Show ("Applying Filter. . .", -1, BTProgressHUD.MaskType.Black);
            BTProgressHUD.InvokeInBackground (delegate { 

            var temp = UIImage.FromFile(path);
            filter.Intensity = TheSlider.Value;
            filter.Image = new CIImage (UIImage.FromFile(path));
            CIImage meh = filter.OutputImage;
            UIImage blah = new UIImage(meh,1,temp.Orientation);
            SizeF newSize = new SizeF(UIImage.FromFile(path).Size.Width,UIImage.FromFile(path).Size.Height);
            UIGraphics.BeginImageContextWithOptions(size:newSize, opaque:false, scale:0.0f);
            blah.Draw (new RectangleF(0,0,blah.Size.Width,blah.Size.Height));
            UIImage croppedImage = UIGraphics.GetImageFromCurrentImageContext();
            UIGraphics.EndImageContext();

            NSData data = croppedImage.AsJPEG();
            byte[] dataBytes = new byte[data.Length];
            if(!Directory.Exists(LocationHelper.FilterLocation()))Directory.CreateDirectory(LocationHelper.FilterLocation ());
            System.Runtime.InteropServices.Marshal.Copy(data.Bytes, dataBytes, 0, Convert.ToInt32(data.Length));
            FileStream f = File.OpenWrite(LocationHelper.FilterLocation()+Path.GetFileName(path));
            f.Write(dataBytes,0,dataBytes.Length);
            f.Close();
                BTProgressHUD.Dismiss();
            });
        }
    }


My end product :


Saturday, June 1, 2013

Adding Email functionality to a Monotouch DialogViewController.


RootElement re = new RootElement("Example");
Section Email = new Section("Email");
if (MFMailComposeViewController.CanSendMail) 
{
    Email.Add(new ImageStringElement("Email",delegate { 
           {StaticClassReference}.EmailFile(path);
        },UIImage.FromFile("Email@2x.png")));
    re.Add(Email);
}

public static void EmailFile(string path)
        {
            BTProgressHUD.Show ("Loading. . .",-1,BTProgressHUD.MaskType.Black);
            BTProgressHUD.InvokeInBackground (delegate {
            UIApplication.SharedApplication.Windows[0].InvokeOnMainThread(delegate {
            MFMailComposeViewController mail = new MFMailComposeViewController ();
            mail.MailComposeDelegate = new CustomMailComposeDelegate ();
            mail.AddAttachmentData(NSData.FromFile(path),MIMEAssistant.GetMIMEType(path),Path.GetFileName(path));
                    UIApplication.SharedApplication.Windows[0].RootViewController.PresentViewController(mail,true,null);
            
                    BTProgressHUD.Dismiss();
                });
            });
        }

public class CustomMailComposeDelegate : MFMailComposeViewControllerDelegate
{
    public override void Finished (MFMailComposeViewController controller,
                                   MFMailComposeResult result, NSError error)
    {
        controller.DismissViewController (true, null);
    }
}


My only note on this, is that you'll need a consistent way to determine mimetype.

Behavior for the OS shifts based on Mimetype.  Example, if the file is a picture, the mail controller will load the image within the email, so that you can see it.  There could be other mimetypes it has special behavior for at some point.  The mimetype that is sent doesn't really matter to the mail controller, for the most part.

You do however really need the "CanSendMail" statement, which tells you whether someone has setup an email account on their device, whether IPhone or IPad.

You only want the Email option to show if they have configured their email accounts.  Otherwise serious breakage occurs.

: )